
Discovering IP Cameras
Discovering the IP address of your IP camera is the first step. To do so, use the IP camera manufacturer's discovery / finder tool. Examples include ACTi Utility Suite, Axis Camera Management, Arecont AV100, IQFinder, Pelco Device Utility, etc. You can also try using tools built into VMS systems but the manufacturer's own tool is likely to work the best.
Pinging IP Cameras
Once you discover the IP address of the camera (e.g. 192.168.2.144), you can then try to ping it from your PC. Pinging tests whether one computer (e.g., your PC) can reach another computer (e.g., your IP camera).
Below is an example of where pinging fails. This often happens when you first try to connect:

Being on the Same Network
The IP camera and the PC need to be on the same network. Typically, this means that the first 3 segments (called octets) need to be the same.
- Good: IP Camera address is 192.168.2.4 and PC address is 192.168.2.10 - The first three are the same (192.168.2) so they should be on the same network
- Bad: IP camera address is 192.168.2.4 and PC address is 192.168.1.10 - The first three are NOT the same so they are likely not on the same network.
Exceptions do exist in advanced configurations but this rule of thumb (first three being the same) will work in most situations.
Checking Network Configuration
Often the IP address of the camera and your PC are different. To find out your PC's IP address, you use a command called, ipconfig, showed below:

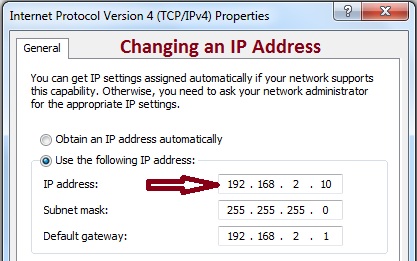
Changing IP Addresses
To connect to an IP camera and do initial setup you might need to change your IP address to be on the same network as the camera. Here's the Windows interface to do so:
Verifying Connections
Once the IP camera and your PC are on the same network, you can ping again to verify that you can reach the IP camera. Here's what it looks like when pinging is successful:

Once you can ping the IP camera, you can then connect to it via a web interface (using the camera's IP address) or add it into a VMS.
This is dummy text. It is not meant to be read. Accordingly, it is difficult to figure out when to end it. But then, this is dummy text. It is not meant to be read. Period.
ConversionConversion EmoticonEmoticon